Fairy Garden Shabby Chandalier

Fish Hook Chandelier

Fish Hook Chandelier

Inspired by an image on Pinterest of a miniature chandelier made out of a fish hook I gathered up some supplies and decided to give it a go.

First off – who knew fish hooks came in such an array of sizes. I decided to buy several sizes but settled on one about 1 1/2″ high for my experiment.

Step one -squeeze those nasty little barbs on the fish hooks until they are good and flat ( pliers) and nip the pointy ends from the hooks with a a little wire cutter.

gathered-supplies -fish-hook-chandalier  I picked up some clear seed beads and some larger clear beads as well as some even larger colorful beads. For the larger beads I looked for ones with a bead cap that could be used as a candle drip catcher.  reconfigure -beads      
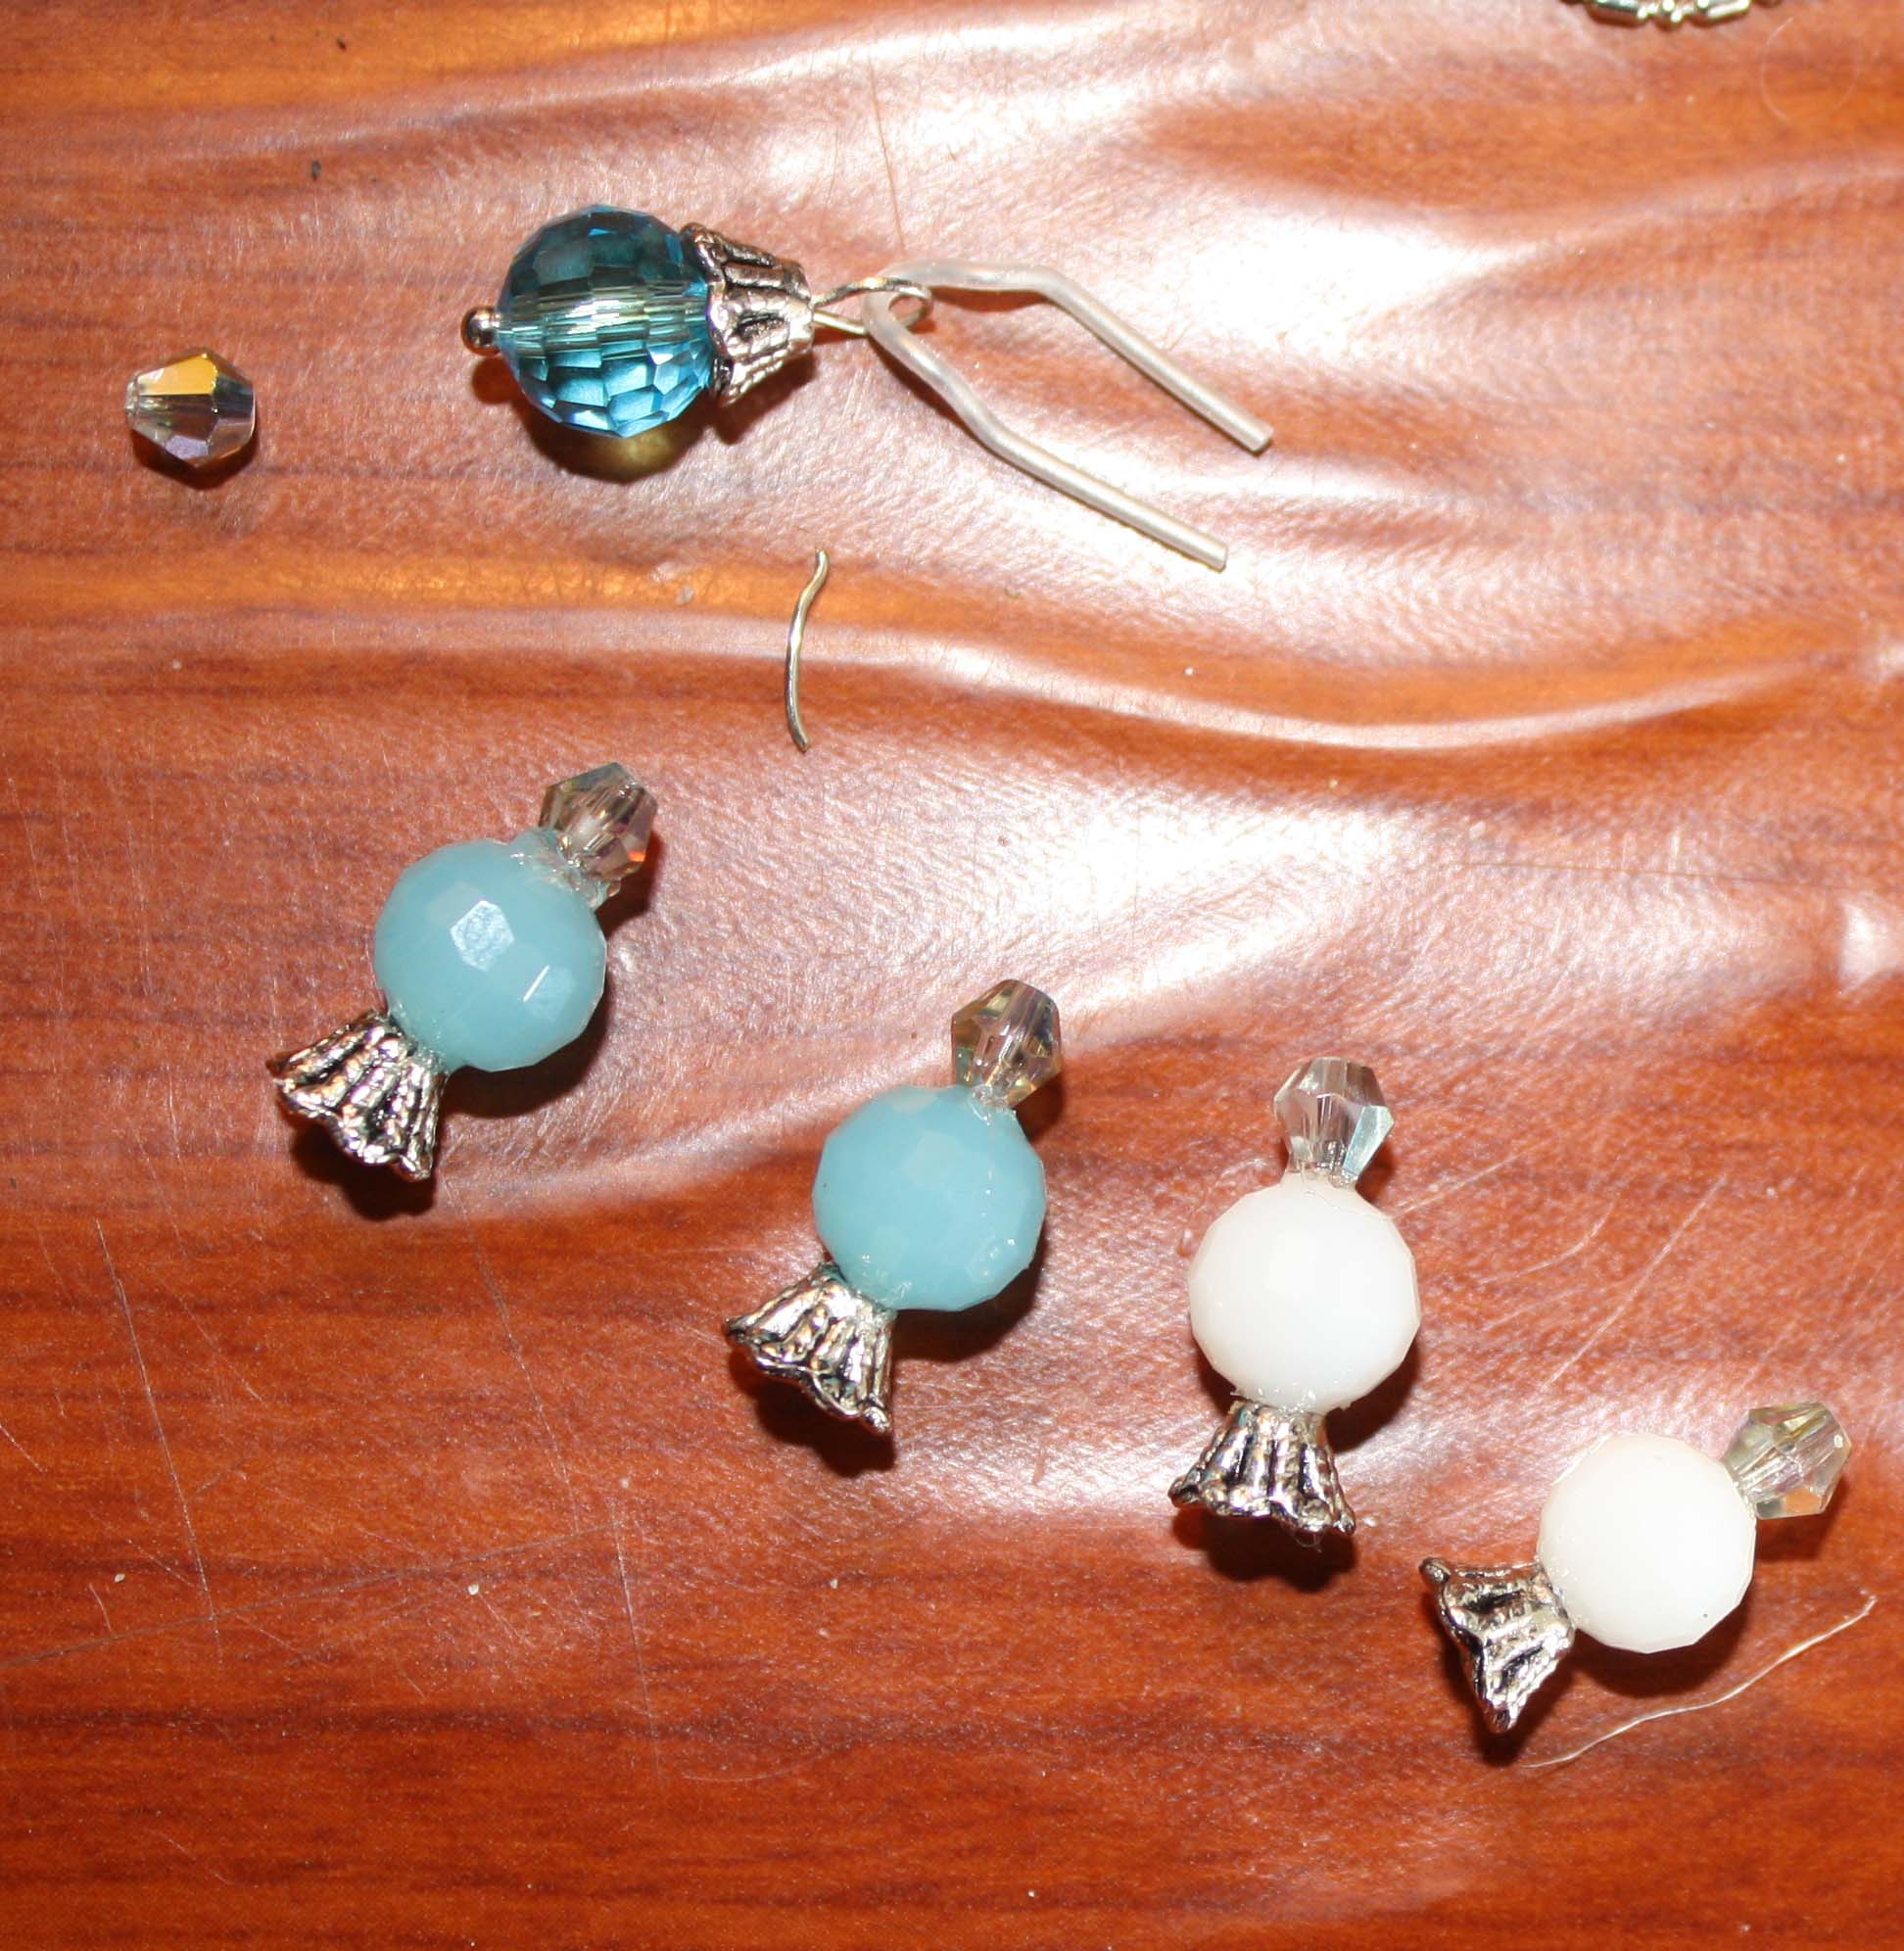
Step Two – I pre-assembled a few items. The largest bead was dismantled, reassembled and embellished with a small clear teardrop bead to form the part that would attach to the top of each hook and eventually hold the candle.  The hole in the tear drop bead fit over the hook a little making that part easy to glue. get-some-peieces-ready

A few strands of beading wire with curled ends were used to make the three pieces that would attach to the middle of the fish hook where beads would later hang. More beading wire pieces with a tear drop and several seed beads were made ready for hanging as well.

Step 3 – Assemble. Easier said than done 🙂 I painted the fish hook first. Much of the paint rubbed off during the assembly – and I’m going with the “I meant to do that story” and calling it shabby chic!

I started in the middle with the three pieces of twisted wire with curls at the ends, poisitioning them evenly around the middle post as best I could. Then I twisted a bit of wire around the bottom and top of the group.  I pulled and poked and eventually shaped the twisted wire into a shape I found pleasing and that would allow me to hang beads out away from the post, and then tightened the wire I had placed at the  top and bottom.

making-the-candlesAfter the bead chains were hung and the larger beads glued to the hooks it was time to make the candles.

Premo translucent clay was used  for making the candles. I just rolled out a thin snake, cut a few little pieces, poked a tiny bit of wire in the end and popped them in the toaster oven. Glue.

Fussy but fun. Keep crafting and, as always, have a fairy good time. Marthe

Fairy Garden House from Bird House

Sometimes the best things come from just starting a little experiment and letting it take you where it will.

fairy-houses-from-bird-house-croppedI often see cute plain wood bird houses in the dollar store ready for decorating and think there must be a way to turn that into a fairy house. I’ve brought a few home and today I decided to tackle one and see what would unfold. I also had some pine cones stashed away so I started by getting out my garden sheers and tearing it apart into pieces for a roof covering.

While doing so I was eying up the bird house and wondering how I could get rid of the perch sticking out . I took my garden sheers to it and sure enough , that worked. The wood seemed quite soft so I then used a box cutter to cut the bird hole into a doorway shape.fairy-house-from-bird-house-3

I added a little artificial moss to the roof and was thinking I wanted something twiggy to happen next. Then a lovely woman from PEI called and asked If I could paint some fairy houses with some lively colors for some young children coming into her life and suddenly I wanted color. I also had a notion to incorporate some twisted wire and nail polish ideas I had played with lately.

The result was a somewhat disjointed looking mess but I did not despair. I liked the happy color and decided to white wash the pine cone roof..add a poly clay door frame and a window. The thought came that it was getting a bit of a beach hut look so I went with it and made the window a fish shape.  From no where really, I thought I could make the funny wire nail polish thing in the doorway fit in by adding a ‘bead curtain’ of wire and clay.  The brown moss got touches of preserved brighter green moss to color it up. A final touch was some clay flowers hanging from the roof like patio lanterns.

And there it was..my experiment had morphed itself into some kind of beach hippy love hut fairy house. Not at all what  I started out to do!

hippy beach

So experiment..and as always , have a fairy good time, Marthe  And thank you to Mary from PEI for coloring my day!

Fairy Garden Patio

Here’s a little fairy garden patio that you can make in just a few minutes for under 3$fairy-garden-patioThis little patio is made of polymer clay. It does not require any fancy clay tools so even if you are not into clay you can do this. I used Copper Sculpey Premo. I like Premo because even after it’s baked it retains a little bit of flexibility. This means it can expand and contract in the heat and cold making it suitable for outdoor use as well as indoor.

You can buy a little 2 ounce brick of clay at a craft store for under 3$. Soften by kneading and then roll into a ball. Flatten the ball a bit with your hands and then roll it out with a rolling pin or glass bottle. Mine is about 2/8ths of an inch thick.

I use a straight edge to make the lines first and a then a pointy toothpick by hand to give it a bit of an irregular line. While the clay is still soft you can poke something decorative into it before baking at 275 degrees for about twenty minutes on a cookie sheet.  I put little beach pebbles arranged in a flower pattern. Done!

Keep crafting..and..as always..have a fairy good time, Marthe

Itsy Bitsy Fairy Garden Stuff

Pill Bottle Fairy House

Pill Bottle Fairy House

I’m just nuts about seriously tiny fairy garden stuff. Micro things.

One day I happened upon an open tub of drywall compound (not at all unusual in our house) on my way to toss out an empty prescription bottle. The urge hit, and I quickly had the top half inch and the cap sawed off the bottle and dunked into the muck.

There’s always some buckets of pebbles and stone on hand where ever I am, so I poked a few into the muck – chopped up a bit of bark –  pinched a tad of artificial moss from my fairy garden supplies – a bit of glue -a drop of  paint – voila! A miniature fairy house.

It’s not fancy, and it’s not going to sell on Etsy …or anywhere else for that matter. But the few minutes taken out of a busy day to follow my whim was sheer delight.

Now, the teensy weensy miniature garden pebble chairs and table? That’s another fairy garden story. Now go make a 15 minute fairy garden story of your own!

As always, have a fairy good time! Marthe

FB Group Rescues the Stone Fairy House

In December 2013, along with picture below, I wrote a post on building a stone fairy house for your fairy garden. The instructions included using a technique for the main part of the house that I described in another post. Well , the main part of the house has worked out fabulous. Not so the roof!

I admit I am a little clumsy and I dropped it on a cement patio stone – the first time – and it hit the edge of a counter the second time. Still, I like to be able to put my fairy houses outdoors. I worried that the roof being on a different kind of plastic base than the bottom, was more brittle and determined that I would find a fix.

DIY Stone Fairy

DIY Stone Fairy House

After trying some silicone suggested in an online article and not being happy with the mess and difficulty of working with it, I decided to turn to the experts. People who do these kinds of crafts all the time. Namely, the members of a great group on Facebook called Miniature and Fairy Garden Chat. I posted my pic, expressed my frustrations and not very long afterwards I had a wealth of great tips, suggestions and information.

Nanci Z-S thought I was on the right track with the silicone and offered a great tip to make it easier to work with. She says she squeezes her silicone into a dish of water with plenty of dish soap and pulls out what she needs with soapy hands. The silicone will not stick to your hands but will stick to everything else. I’ll bet this extends the working time too.

Several people suggested using a sealant of some sort and Melinda T said she uses mortar after gluing the stone down. She added  that using cheese cloth to wipe the excess mortar away does a good job of cleaning all the residue from the stone. Gluing something to the plastic before the stone was also suggested, such as plastic mesh…I tried burlap and it does seem to be helping make the stone adhere easier.

The first suggestion made was jewelery glue, and the discussion came full circle back to this when  Debbie G mentioned E6000 and Jill A-H and Colleen F started to sing the praises of this apparently very useful adhesiveE6000-adhesive- product.

The product description found on Home Depot says  “Amazing E6000 Craft is a unique adhesive formulated to meet high performance industrial requirements, thus making it an excellent crafting tool. Amazing E6000 has exceptional adhesion to wood, metal, glass, fiberglass, ceramics, and concrete. It also adheres strongly to leather, rubber, vinyl and many plastics. Amazing E6000 dries clear and once cured, it’s waterproof, washer/dryer safe, can be painted and is safe for photographs.”

Sounds like ‘amazing’ stuff. What do you use for difficult fastening jobs?

Keep crafting, and, as always…have a fairy good time.

Marthe


Fairy Garden Supplies – A Unique Source

I wonder if many fairy gardeners also have fish? If you don’t keep fish, then you probably haven’t discovered that the aquarium store is a surprisingly great place to get DIY fairy garden supplies!

mushroom-log-aquarium-decoration

Mushroom Log Aquarium Decoration

The aquarium decoration isle will yield some interesting results.  This mushroom log is 8″ x 4″x 7″ and sells (in Canada) for $15. It just needs a little DIY fairy door to make it a wonderful fairy house for your miniature garden. Bonus – aquarium decor is non-toxic.

aquasand

‘Aqua Sand’ Aquarium Substrate

Now for landscaping your fairy abode. The substrate section alone can fascinate me for an hour. The unbelievable variety of stone, gravel, and course sands- aka miniature landscaping aggregates- comes in quantities that are ideal for various sized fairy gardening projects. Many of the substrates are coated with 100% environmentally friendly resin, – no dust. The coating also keeps them looking pretty and prevents any undesirable elements leaching into your garden when you water. A 5lb bag runs around $7. Next, take a look over in the reptile section.

small reptile feeder

Small Reptile Feeder

Reptile feeders are designed to blend in with a rock, stone and wood environment and need to have uneven surfaces for reptiles to crawl on. This makes them ideal for use as a miniature fairy garden ponds! Add a little acrylic water and decorate with  some miniature lily pads, a frog or some fish. This feeder measures 4.5″ x 4″ x 1″ and retails for just  $4.

While you’re in the reptile department also take a look at some of the bedding. You can find some nice sized bags of bark chips for your garden or DIY fairy house project. They also have some reptile carpets that make nice lawns that are meant to get wet.

As always- have a fairy good time…this time at the aquarium store! Let me know how you make out…


Two Brown Thumbs?

Do you want a fairy garden but have two brown thumbs? It can be done. I have two suggestions; artificial plants and flowers,  really easy care inexpensive plants.fairy-garden-french-chateau-field-stoen-tiles-artificial-palts-mostly

This fairy garden uses mostly artificial plants and flowers. The sunflowers in the foreground are commercially made miniature sunflowers. I’ve augmented them a little buy cutting little pieces from an artificial fern and tucking these in around the bottom. I wrapped a bit of wire around the bits and pieces to make them into little picks to make it easier to insert them into the soil. I used these along the edge of the stone walkway for a hedge affect as well.

The tree was also made from an artificial fern (from the dollar store) I butchered and reassembled it on some twigs from the yard to give it a nice tree appearance. The other yellow flowers and the trellis with purple flowers near the fairy house door are made of polymer clay and are very easy to do.

I’ve tucked a bit of artificial moss under the yellow clay flowers, under the windows on the house and under the tree.

Finally, for real plants, small succulents from your local nursery are usually very inexpensive, have a nice scale for a fairy garden and are almost impossible to …shhhh..you know. Moss is also a great idea for an easy care fairy garden, particularly in a terrarium where it should not even require watering… but more on that in my next post

So, brown thumbs or not..go make a fairy garden already. As always…have a fairy good time! Marthe

Make a Stone Fairy House

Fairy HouseBannerpic I’ve always been attracted to the cozy stone homes that dot the landscape along the Lake Erie shores near my home in Ontario, Canada. They appear inviting and almost magical to me. Like real life fairy houses. So when I took up the hobby of miniature gardening almost my very first thought was  to make a miniature stone house of my very own.  After many experiments I stumbled on a quick and easy way to get that tiny stone house look using DIY veneer. Here’s how.

What You’ll Need

  • Glue
  • Ziplock bag
  • A form – bird house, old margarine container, gourd or other item
  • Some small stones
  • Tweezers
  • Shellac or urethane

Optional – Laundry Bad/ Plastic berry box, artificial moss

Materials

Materials

Getting Ready

I live near a lake so I just gather handfuls (and buckets full) of beach pebbles. I’ve also used crushed stone that’s commonly used on gravel roads and driveways. This can be purchased in  bags at places like Lowe’s and Home Depot. Smaller packs of stones can sometimes be found at craft and dollar stores. Any stone will work that is small and has some flat-ish surfaces.I’ve applied stone this way to gourds, wood, and even glass. This time I am experimenting with a plastic juice bottle and a plastic salad bowl.

EasyStoneWork2The plastic berry box comes in handy to sift out  the tiniest of stones and some of the sand. Remove any stones that are larger than a 1/4″ and set them aside. I now have some fairly uniform sized pebbles. Next,  put them in a mesh laundry bag and give them a good shaking around out doors. This gets rid of most of the sand and the rest disappears when I give the stones a rinse while still in the bag.

What to Do

First squeeze some wood glue onto the Ziploc baggie and spread it around making  several small square areas up to 4 inches square.  Then take some stones and arrange them on the glue. I like working with beach pebble. You can more or less just dump them on the glue, pat them down and do just a little adjusting to get them into a nice little square. The crushed stone takes a little more fussing, so just start with one or two glue squares. The tweezers come in handy for adding the tiniest of stones to fill in any spaces.

Wait about half an hour and check your squares. The glue will dry around the stones much faster than it will dry to the soft plastic.Try lifting the stone from the corner. When its ready you will be able to lift the square of stone without the stones separating. EastStineWork4The trick is, you need to lift the square while the glue is still tacky on the under side and the square is still flexible.  This allows you to apply it on rounded areas. If it dries out completely, no worries. You will still be able to lift it from the plastic and you can add some glue to the back.

Next

Now you can apply the stone to whatever form you have chosen for your project. Cut out any windows or doors you want before applying the stone. You should still be able to pull individual stones away from the veneer if your square overlaps any cut out areas.  Wood glue works well for gluing stone to stone as well for making garden walls, arches and anything else you can imagine. However the finished project can be brittle, so add a couple of coats of varnish to help make it more stable and useful for outdoors.stonegardenwalland arch

For around doors and windows and on the roof of my project I glued stones one at a time to my form. On the roof you might see some ‘flowers’. Pebble mosaics, if you have the patience is a nice touch. Finally, after varnishing I add a pinch of artificial moss here and there to give my project an aged look.

Have a very fairy good time!

Easy DIY Stone Veneer for Fairy Garden Houses

Stone House Bothwell, Ontario http://www.museevirtuel-virtualmuseum.ca/sgc-cms/histoires_de_chez_nous-community_memories/pm_v2.php?id=record_detail&fl=0&lg=English&ex=380&hs=0&rd=97925

Stone House Bothwell, Ontario

I’ve always been fascinated and drawn to those beautiful field stone homes that look so cozy and inviting. Like real life fairy houses. Stone houses, bridges, and pathways find a perfect home in a fairy garden. Good news. After many experiments I stumbled on a quick and easy way to get that tiny stone house look using DIY veneer. Here’s how.

What You’ll Need

  • Wood glue
  • Ziplock bag
  • A form – bird house, old margarine container, gourd or other item
  • Some small stones
  • Tweezers
  • Shellac or urethane

Optional – Laundry Bad/ Plastic berry box

Materials

Materials

Getting Ready

I live near a lake so I just gather handfuls (and buckets full) of beach pebbles. I’ve also used crushed stone that’s commonly used on gravel roads and driveways. This can be purchased in large bags at places like Lowe’s and Home Depot. Smaller packs of stones can sometimes be found at craft and dollar stores. Any stone will work that is small and has some flat-ish surfaces.I’ve applied stone this way to gourds, wood, and even glass. This time I am experimenting with a plastic juice bottle and a plastic salad bowl.

EasyStoneWork2The plastic berry box comes in handy to sift out  the tiniest of stones and some of the sand. Remove any stones that are larger than a 1/4″ and set them aside. I now have some fairly uniform sized pebbles. Next,  put them in a mesh laundry bag and give them a good shaking around out doors. This gets rid of most of the sand and the rest disappears when I give the stones a rinse while still in the bag.

What to Do

First squeeze some wood glue onto the Ziploc baggie and spread it around making  several small square areas up to 4 inches square. Then take some stones and arrange them on the glue. I like working with beach pebble. You can more or less just dump them on the glue, pat them down and do just a little adjusting to get them into a nice little square. The crushed stone takes a little more fussing, so just start with one or two glue squares. The tweezers come in handy for adding the tiniest of stones to fill in any spaces.

Wait about half an hour and check your squares. Try lifting the stone from the corner. When its ready you will be able to lift the square of stone without the stones separating. EastStineWork4The trick is, you need to lift the square while the glue is still tacky on the under side and the square is still flexible.  This allows you to apply it on rounded areas. If it dries out completely, no worries. You will still be able to lift it from the plastic and you can add some glue to the back.

Next

Now you can apply the stone to whatever form you have chosen for your project. Cut out any windows or doors you want before applying the stone. You should still be able to pull individual stones away from the veneer if your square overlaps any cut out areas.  Wood glue works well for gluing stone to stone as well. Using the same methods you can make small rectangles or lines of layered stones and apply them around doors and windows or corners. Or, make stone garden walls. To finish off add dots of glue and use the tweezers to add little stones into any areas that need it. Two or three coats of shellac or urethane will help keep the glue from degrading in the outdoors. How easy is that?

EasyStoneWorkDoneHave a very fairy good time!